Users must be running Famous Release 123 and higher to use InfoMaker 2017 R3.
Purchasing InfoMaker
Contact your Famous salesperson to initiate the purchase of InfoMaker or additional InfoMaker licenses.
Before You Begin
Be sure that all system requirements are met, and that you have completed all pre-installation tasks. Click here for information.
Installation Files
Famous Network Services will save the InfoMaker 2017 R3.zip file to the Famous60 folder on your Famous server.
Follow the instructions provided below to complete the installation process.
Install InfoMaker Version 2017 R3
From the location to which the InfoMaker Version 2017 R3 files were saved, run Setup.exe.
On the Welcome page, click Next to begin.
On the License Agreement page, select the location where you are installing InfoMaker (e.g., United States), review the license agreement, and choose the I Accept option (if you choose the I Do Not Accept option, the installation will be terminated). Click Next.
On the Customer Information page, enter your user and company names, and then click Next.
On the Choose Destination Location page, the Destination Folder location should be C:\Appeon. This location is shown by default when installing InfoMaker 2017 R3 on a 32-bit machine.
Note
When installing InfoMaker 2017 R3 on a 64-bit operating system the default installation location must be changed to C:\Appeon. The default installation folder, C:\Program Files (x86)\Appeon, will prevent connection to the Famous database.
Click Next.
On the Destination Location for Shared Files page, click Next to accept the destination path shown, or click Browse and select a different path, click OK, and click Next. Use the same folder for shared files for all products in this set.
On the Specify SQL Anywhere Engine page, select No, I do not want to use the SQL Anywhere Engine, and then click Next.
On the Select Components page, select the components you want to install. You can leave these set as the default if you choose. Click Next.
The Select Program Folder page shows that the InfoMaker program files will be added to the Program Folder. Click Next.
On the Start Copying Files page, review and change the installation settings if needed, and then click Next to begin copying files.
The Setup Status page shows the progress of the InfoMaker installation configuration.
The InfoMaker installation is complete. Select if you wish to view the ReadMe files, and then click Finish.
Reboot your system when convenient. InfoMaker will not function correctly until the system has been rebooted.
Run InfoMaker
Run InfoMaker (for example All Programs > Appeon > InfoMaker 2017 R3).
Log in to InfoMaker with the credentials provided to you by your company's InfoMaker license manager.
Click Yes to automatically create a default library in which to store objects.
Set Up Your Database Connection
Identify the company number to be used in the ODBC connection:
Log into Famous using the Company for which reports will be written.
On the menu bar click Help and then About.
Click the User Information tab.
Listed under the Current Company field, make note of the company number for Step 4 below.
In the image below the company number is 1.
In InfoMaker, click the DB Profile button.
In the Database Profiles dialog box, select "Oracle 090 Oracle 9i," and then click New.
Enter the following in the DB Profile Setup dialog box:
Profile Name = FAMOUS
Server = FAMOUS (this entry will always be FAMOUS regardless of the host name of the actual server)
Login ID = company_1_rpt (substitute 1 for your company number from Step 1 above)
Password = famous or FAMOUS (or password as set in Famous Admin in Company Profile Maintenance)
Clear the Commit on Disconnect checkbox. Click OK.
Select the FAMOUS Database Profile. Click Connect.
Set Your Default Library
Now set your default library in InfoMaker. Click File > Select Library.
On the Browse Tab, navigate to your working pbl (e.g, UserRpts.pbl pr Global.pbl. Select the file name for your working pbl, and click OK. This becomes your default pbl when you launch Infomaker. The UserRpts.pbl is located in your My Documents\Famous directory.
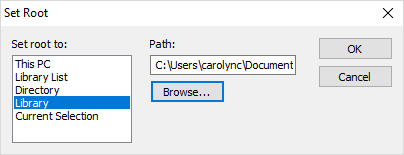
Click the Library button. Right-Click on the blank area of the left pane, and select Set Root...
In the Set Root window, select Library, and then browse to your working pbl. (UserRpts.pbl is located in your My Documents\Famous directory. Click OK.
Post-Installation Tasks
Before using InfoMaker, you might need to perform some migration or configuration tasks after installation.
If you have applications and PowerBuilder libraries (PBLs) that you created in an earlier version of InfoMaker, you can migrate them to version 2017 R3. Before you do, make sure your PBLs can be successfully regenerated under the earlier version, and make backup copies. For details about migrating PBLs, see the chapter on working with libraries in the Users Guide. Before you migrate to a later version, read the Migrating PowerBuilder Applications technical document to learn about changes in InfoMaker that might affect your application. Topics with IM in parentheses after their titles apply to InfoMaker.
InfoMaker How-To Videos
Once you have successfully installed InfoMaker you can start using it to create your own custom reports. We have created instructional videos to help you get started. Watch the InfoMaker Custom Reporting videos by logging in to the Support area of the Famous website and going to the InfoMaker tutorial videos.